Sewing-4-Sanity
Thriving not just surviving
Simple Sleeve Stripe Tutorial

Do you want to give your shirt an extra little bit of pizazz?! Well then this tutorial is for you! In just a few simple steps, you can add stripes to the sleeves. Here’s how…
First things first, you will need the following:
- The fabric to make the shirt (I prefer raglan) using any pattern you have (mine came from Christy’s Cute Designs).
- HTV in the color you want to make the stripes (you could also use knit fabric instead of HTV)
- Scissors
- Ruler
- Rotary cutter & cutting mat (optional)
- An iron/ironing board
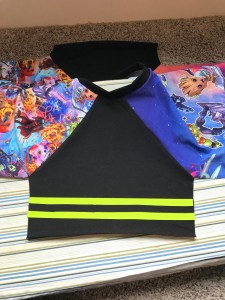
Step 1: Construct your shirt as directed in the pattern instructions, stopping before you sew the side seams together. This is what you should have when you stop:

- Note: You can apply the stripes before you even start constructing the shirt, but I like to do it this way so I have a good visual of placement when I’m deciding.
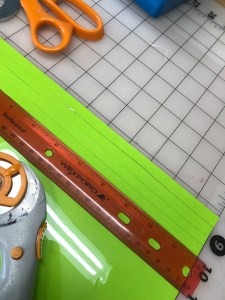
Step 2: Now you want to figure out how long and wide you want your stripes. For this shirt (which is a size 6), I want to do two stripes on each sleeve. You want to make sure you are taking into account the hem when you are trying to determine your stripe placement. The longest stripe needs to be just under 10″ long (as you can see in the picture below) for me to get two stripes on this sleeve and leave room to hem.

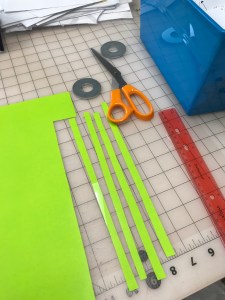
Step 3: After you decide on your measurements, it’s time to cut the HTV! I made my stripes just under 1/2″ here and 10″ long (although 10″ is a little long, I would rather it be a little long and have to trim the edges than be too short). I used a rotary cutter and ruler, but you can also just use scissors if that’s what you have on hand. Here’s me cutting the strips…
And what they look like cut (now, I was not going for perfection here, so I just eye-balled the widths):
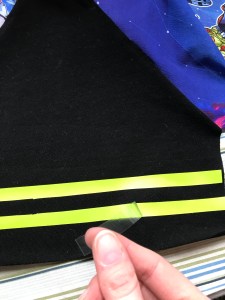
Step 4: Now that you have the stripes cut, all you have to do is iron them on! Line them up on the sleeve exactly how you want them to look, with the shiny side of the HTV up. Carefully place a thin shirt/piece of fabric over the stripes and press with your iron (or heat press if you’re lucky). I usually hold it for about 15-20 seconds. Make sure you don’t use steam when pressing! Then just peel off the shiny plastic.
If you want to use fabric strips instead of HTV I would suggest using knit fabric so that it won’t fray. If you iron Heat n’ Bond Lite to the back before you stitch the stripes on they stay a little neater. To use fabric, pin the stripes in place, and stitch 1/8″ from the edge of down each edge of the stripe.
Step 5: Now you’re ready to finish you shirt! Sew those side seams together, hem, and you’re set!!! How easy was that?!

If you want a more in depth tutorial on how to cut and use HTV, check out the guest blog I did over at New Horizons here!
